
Help Center
FAQs & Trouble Shootings
[divider style=”simple”] [/divider] [toggle title=”01. Host Configuration Guide For vCloudPoint’s Shared Computing solution” state=”off” style=”simple” icon=”question-sign”]View Host Configuration Guide For vCloudPoint’s Shared Computing solution in xls file. For support on a typical deployment, please contact our support team.
[/toggle] [toggle title=”02. How does Microsoft license the Windows desktop for the multi-user and the virtual environments?” state=”off” style=”simple” icon=”question-sign”](Last update: 09-Jul-2019)
Windows licensing for Shared Computing:
To properly license vCloudPoint zero clients in a Windows multi-user system, certain CALs are needed for each vCloudPoint seat, along with certain OSs running on the host computer.Both Windows client operating systems and server operating systems will work with the vCloudPoint Shared Computing solution but at this time, the Windows client operating system does not permit licensing a multiuser solution under Microsoft compliance, only the Windows Server operating systems provide a multiuser solution using Remote Desktop Services (RDS) and/or other technologies. In order for the vCloudPoint workstations to be fully licensed, they will each need a Remote Desktop Services Client Access License (RDS CAL) along with a Windows Server Client Access License (WS CAL). The total cost of these CALs combined will range anywhere from $10-$120 per seat depending on the type of organization deploying the workstations, and your licensing agreement with Microsoft. But these CALs are perpetual licenses – not annual subscriptions.
Windows Server Client Access Licenses (WS CALs)
A Windows Server CAL is a license that allows customers to access Windows Server. CALs are used in conjunction with Microsoft Windows Server OS licenses to allow Users and/or Devices to access and utilize the services of that server OS.
Remote Desktop Service Client Access Licenses (RDS CALs)
RDS CALS are required for users or devices that want to utilize Remote Desktop Service functionality on Windows Server.
About the version of CALs
Windows Server CALs must be the same version as—or higher than—the server software they are accessing. In other words, users or devices accessing a server running Windows Server 2016 must have Windows Server 2016 CALs. Additionally, Windows Server 2016 CALs may be used to access Windows Server 2012 (but Windows Server 2012 CALs cannot be used to access Windows Server 2016).
The result of the licensing model differences by using the shared computing, traditional desktop PCs and VDI over three years can be seen in the following example:
Sharing: One server OS license per target server ($883) + For each client device: ( 1 Server device CAL ($30) and 1 RDS device CAL ($102)) x 30 = $132 x 30 = $4,843
Desktop PCs: 30 target desktop OS licenses ($187 each) x 30 = $5,610
VDI: 30 target desktop OS licenses ($187 each) x 30 + For each client device: VDA rights subscription ($100 / device / year) x 30 devices x 3 years = $14,610
* Cost based on 30 zero clients (not eligible for SA) over 3 years, Windows Server 2012 R2 standard, Windows 8.1 Pro, US VOL pricing, corporate customers.
Things to consider:
- If you are replacing PCs, you may already have the WS CAL for each seat.
- If you are replacing thin clients, you may already have both the RDS and WS CALs.
While deploying zero clients from vCloudPoint, the required licenses mentioned above must be purchased from Microsoft Windows. It is significant to note that Microsoft’s license policy varies between countries and vCloudPoint users are requested to refer to their local Microsoft’s partners before purchase.
For further details on Microsoft’s multi-user licensing please refer to Microsoft’s website or licensing brief titled: “Licensing Windows Client Operating Systems in Multiuser Scenarios“.
Windows licensing for the virtual environment:
What kind of Microsoft license should I purchase for using the Windows desktop for virtual environments?
The license you should purchase for virtual environment depends on the type of Windows OS you use within a VM.
- Running a Windows Server OS within a VM: (1 VM for multiple users)
Besides the standard server OS licenses based on the actual number used, each vCloudPoint zero clients will need a Remote Desktop Services Client Access License (RDS CAL) along with a Windows Server Client Access License (WS CAL).
- Running a Windows Client OS within a VM: (1 VM for 1 user)
Besides the standard Client OS licenses based on the actual number used, each vCloudPoint zero clients will need a Windows Virtual Desktop Access (VDA) in order to access a Windows VDI desktop.
What is Windows Server Client Access Licenses (WS CALs)
A Windows Server CAL is a license that allows customers to access Windows Server. CALs are used in conjunction with Microsoft Windows Server OS licenses to allow Users and/or Devices to access and utilize the services of that server OS.
What is Remote Desktop Service Client Access Licenses (RDS CALs)
RDS CALS are required for users or devices that want to utilize Remote Desktop Service functionality on Windows Server.
About the version of CALs
Windows Server CALs must be the same version as—or higher than—the server software they are accessing. In other words, users or devices accessing a server running Windows Server 2016 must have Windows Server 2016 CALs. Additionally, Windows Server 2016 CALs may be used to access Windows Server 2012 (but Windows Server 2012 CALs cannot be used to access Windows Server 2016).
What is Windows Virtual Desktop Access (VDA)?
Windows VDA is a device based subscription designed to help organizations license devices that do not qualify for Windows Client SA, such as thin clients and contractor-owned PCs, so these devices can access a virtual desktop. Windows VDA is available for $100 / year/ device through all major Microsoft Volume Licensing (VL) programs.
Pricing is retail pricing in USD, and prices may vary depending on your location and agreement with Microsoft. Microsoft reserves the right to change prices at any time.
The result of the licensing model differences by a 30-user deployment using 1 VM with server OS for 30 users, 30 VMs with client OS for 30 users, and 5 VMs with client OS for 5 users + 1 VM with server OS for 25 users, over 3 years can be seen in the following example:
1 VM with server OS for 30 users: 1 server OS license for each VM ($883) + For each client device: ( 1 Server device CAL ($30) and 1 RDS device CAL ($102) x 30 = $883x 1 + $132 x 30 = $4,843
30 VMs with client OS for 30 users: 30 target desktop OS licenses ($187 each) x 30 + For each client device: VDA rights subscription ($100 / device / year) x 30 devices x 3 years = $14,610
5 VMs with client OS for 5 users + 1 VM with server OS for 25 users: 5 target desktop OS licenses ($187 each) x 5 + For each client device: VDA rights subscription ($100 / device / year) x 5 devices x 3 years + 1 server OS license ($883) + For each client device: ( 1 Server device CAL ($30) and 1 RDS device CAL ($102) x 25 = $187x 5 + $100x 5x 3+ $883x 1 + $132 x 25 = $6618
* Cost based on 30 zero clients (not eligible for SA) over 3 years, Windows Server 2012 R2 standard, Windows 8.1 Pro, US VOL pricing, corporate customers.
Note: you cannot purchase Windows VDA outright. It is only available as a subscription.
While deploying zero clients from vCloudPoint, the required licenses mentioned above must be purchased from Microsoft. It is significant to note that Microsoft’s license policy varies between countries and vCloudPoint users are requested to refer to their local Microsoft’s partners before purchase.
For further details on Microsoft’s licensing for virtual environments please refer to Microsoft’s website or licensing documents: “VDA_Brochure” and “Microsoft VDI and VDA FAQ v3 0“.
(Last update: 14-May-2016)
1, Your domain system should include at least one Domain Controller and one shared host that has joined the domain system. (DC uses static IP address–> install Active Directory Service from the DC’s Server Manager console–> create the domain–> shared hosts join the domain and point DNS to the DC’s IP address.)
2, Install the vMatrix Server Manager on the shared host(s).
3, Create users on the Domain Controller.
4, Add the domain users to the Remote Desktop Users Group on the shared hosts.
5, Log into the host with vCloudPoint zero clients. Hosts will automatically be recognized if they have joined the domain. The picture below shows two login options: the first domain name “CLOUDPOINT” is chosen for domain login; the second one “Local Account” is for local account login. If users choose local account login, they are logging on the host rather than the domain.
6, Select a domain, and then enter your username and password.
IMPORTANT NOTE:
1, You cannot log in an domain administrator account from a zero client. This will cause unavailability of the whole vMatrix and zero client system. If you mistakenly do this, remove administrators from vMatirxServerRemoteUsers group on the shared hosts thought Computer Management –> Local users & groups –> groups–> vMatirxServerRemoteUsers group
2, Doman NTLM is not supported at the moment
Note:
1. By default, only users in the Administrator Group can log into the remote Domain Controller, users in the Remote Desktop User Group cannot.
2. If you are using a vMatrix version of 1.6.0.4 or earlier, you have to install the vMatrix both on the Domain Controller and Hosts. If you do not want to install vMatrix on Domain Controller, please use vMatrix version of 1.6.0.5 or later.

(Last update: 09-Sep-2016)
By factory default, vCloudPoint zero clients and vMatrix Server Manager software are configured to be used in an internet connected environment (WAN). If your host is provided with the internet, no additional configuration is required to be done. The Operation Mode displayed on the User Management page of any device connecting to the host will automatically change from “Offline” in red to “Online” in black, meaning the device is properly working in an internet provided environment.


However, if the Operation Mode of the devices connecting to the host stays “Offline” in red all the time, you have to re-configure the devices for offline usage, otherwise, the devices may be disconnected every few minutes during operation. Use cases where you may encounter this problem and need to apply for “Offline Usage” normally includes the followings:
- you do not provide internet connection (WAN) to the host or the internet connection is extremely unreliable;
- you use proxy or VPN or internet control software that the host cannot access our configuration server: api.cpterm.com.
How to re-configure the devices for offline usage:
1) In a non-internet connection environment, vMatrix Server Manager will prompt a message window for offline usage configuration within 5 minutes after the host boot.

2) Open vMatrix Server Manager, go to Offline Usage page (this page only appears when the host is not provided with internet connection on system boot).
3) Export the configuration profile. Before exporting, please connect all client devices for offline usage to the host, so that the serial numbers (SNs) will be collected in the file. Alternatively, you can write down the SNs if you cannot connect all the client devices (especially in large deployments). The host profile contains hardware information of the host. Therefore, make sure the host hardware, e.g., CPU, memory, drives and network card, are exactly the same as your real offline usage condition, otherwise, if there is any change to the host hardware, the final generated offline configuration will be invalid to the host.
4) The dealer will return you with a configuration file based on your last exported profile. Import the returned file to complete.
5) If your configuration for offline usage is successfully accomplished, the Operation Mode changes from “Offline” in red to “Offline” in black.
Note: Offline usage configuration on vMatrix Server Manager was introduced in the release of vMatirx Server Manager 2.0.2 version, if you are planning to use the vCloudPoint zero clients in a non-internet or unstable internet environment, please use 2.0.2 or a later version of vMatrix Server Manager, and contact the dealer for generating an offline configuration file.
[/toggle] [toggle title=”05. Host is not shown in the host list at the zero client’s login menu.” state=”off” style=”simple” icon=”question-sign”](Last update: 23-May-2016)
1) The vMatrix Server Manager software is not installed on the host or not working properly.
Resolution: Install or re-install vMatrix Server Manager.
2) The host or the zero clients are not connected to the LAN.
Resolution: Connect both the host and the zero clients to the LAN, and make sure the network is fine.
3) The zero client is with a new firmware version while the vMatrix Server Manager version on the host is out of date.
Resolution: Upgrade the vMatrix Server Manager.
4) IP Addresses in the DHCP pool have been used up so that new connected zero clients cannot find hosts in the LAN while the old connected zero clients do not have the problem.
Resolution: Go to the DHCP setting page and enable more IP addresses or shorten the time of IP address tenancy.
[/toggle] [toggle title=”06. Zero clients cannot connect to the selected host.” state=”off” style=”simple” icon=”question-sign”](Last update: 23-May-2016)
Please resolve the issue according to the prompt if there is, if there is not, refer to the followings.
1) A pop-up window says that the device serial number is invalid.
Resolution: Contact our technical support team with series numbers.
2) Unstable Local Area Network (LAN).
Resolution: Examine cable and switch and make sure the zero clients are connected to the host in the same LAN.
3) IP address pool is full that new devices cannot log in.
Resolution: Lease more IP addresses, and recommend shorten IP address tenancy time in case there is a plenty of mobile devices connecting to the same network.
4) IP address conflict that the sign-in of one user may log the other out.
Resolution: Make sure all devices use a different IP address from the others in the same LAN. Recommend using default DHCP instead of static IP addresses.
[/toggle] [toggle title=”07. Connecting USB devices to vCloudPoint zero client.” state=”off” style=”simple” icon=”question-sign”](last update: 2018-1-5):
USB devices that are tested to work on the vCloudPoint zero clients:
Storage Devices, USB Hubs, Single, Multi-functional & Dot Matrix Printers,Smart Card Reader, Office &
POS Scanners, Single Touch Screens, U keys, Parallel to USB Converters, etc; An external power supply
may be required for devices working on large voltage.
Click to download the list of tested USB devices ; other USB devices that are not listed but functions in the same way are supposed to be supported as well.
Using USB devices with vCloudPoint zero clients:
To use USB devices with vCloudPoint zero clients, you simply installed the native device driver on the host system as you normally do when using PCs. No extra drivers are required for the zero clients. vCloudPoint USB redirection technology allows USB devices to work on the zero clients as well as on the host.
Printing devices and storage connected to the shared host can be accessed by all client users. Printing devices connected to the zero client can be accessed by all other users but storage devices connected to the zero client can be accessed to the current user only due to vCloudPoint’s vCell User Isolation technology.
[/toggle] [toggle title=”08. USB and audio drives cannot be installed in Windows10, 8.1, 8 & 7 Operating Systems without internet connection.” state=”off” style=”simple” icon=”question-sign”](Last update: 11-Mar-2016)
In Windows 10, 8.1, 8, 7 Operating Systems, all drivers and programs must be digitally signed (verified) in order to be installed. If you do not have an internet connection for your first time of vMatrix Server software installation, you have to disable Windows Driver Signature Enforcement. Otherwise, the USB and audio drivers cannot be executed for failure of getting signature verification.
Please follow these steps to disable Driver Signature Enforcement in Windows 10, Windows 8.1, Windows 8, Windows 7, Windows Server 2008 R2 once.
Step 1. Enter in Advanced Options menu.
To enter in Advanced Options menu in Windows 8 & 8.1 OS:
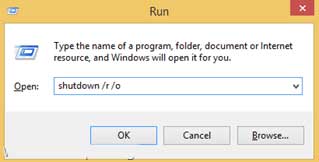
1. Press “Windows” + “R” keys to load the Run dialog box.
2. Type “shutdown /r /o” and press Enter.
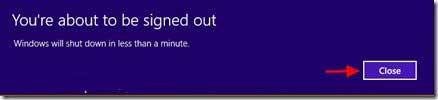
3. Windows informs you that you are about to be signed off. Press “Close”.
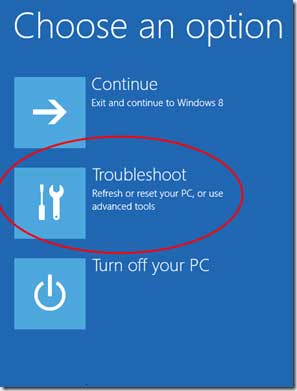
4. When Windows restarts, press “Troubleshoot” .
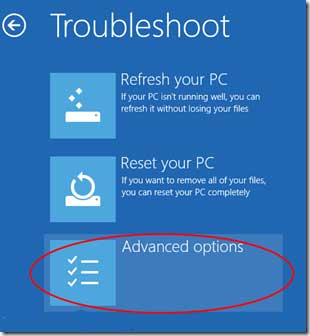
5. In the “Troubleshoot options” screen, choose “Advanced options”.
6. In the “Advanced Options” window, choose “Startup Settings”.
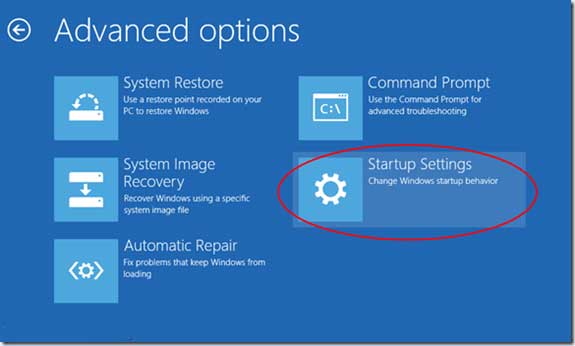
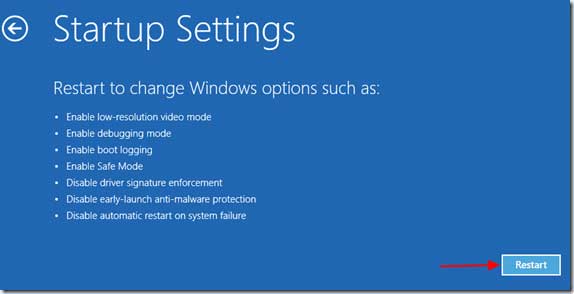
7. In “Startup Settings” screen, click “Restart”.
8. After restart in “Startup Settings” windows, press the “F7” (or the “7”) key on your keyboard to “Disable driver signature enforcement”.
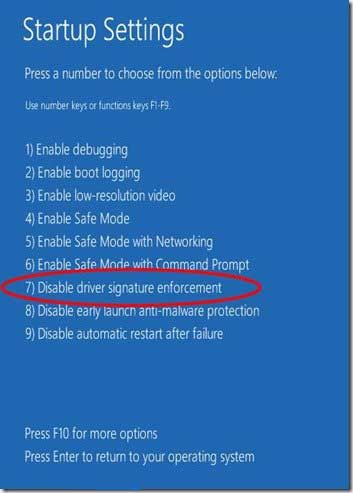
Your computer will restart again.
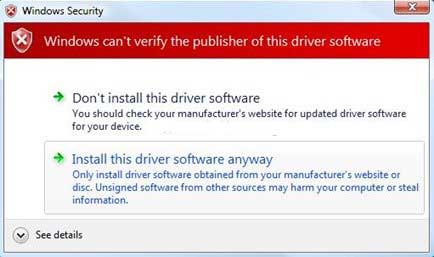
9. After the restart, proceed to install your unsigned driver. During the installation procedure, Windows will inform you that can’t verify the publisher of this driver software. At this point, ignore the warning message and choose “Install this driver software anyway” to complete the installation.
(Last update: 09-Jul-2019)
Why all USB devices, user audio cannot work or videos cannot be played smoothly?
If you have one or all of the above problems, you may probably see “cpaccel.exe” (Cloudpoint Multimedia Accelerator ) error message from Windows or by running vMatrix Diagnostic Tool. This is due to some file missing of vMatrix Server Manager, mainly caused by mistaken removal or block of firewall or anti-virus software. The best and quickest way to fix this problem is to re-install vMatrix Server Manager (make sure you have disabled security software before installation). If you still have this problem in use, you may have to add vMatrix files or ports to the exception list of security software. Also, refer to How to Configure Firewall and Antivirus software for vCloudPoint Products on this page.
If the driver cannot be installed even when there is no security software, try the following steps:
(Last update: Jul-23-2019)
What software can or cannot be run on vCloudPoint zero clients?
Most popular Windows software can be run with vCloudPoint zero clients such as Office Applications, Skype, Outlook, Chrome, Firefox, IE, Edge, Teamviewer, Adobe Photoshop, Adobe Illustrator, Adobe After Effects, Adobe Indesign, AutoDesk CAD, and Camtasia, etc. Generally, software from well-known software companies are compatible with the multi-user shared environments. A few software such as VPN software cannot work in the multi-user environment. To know if your desired software can be run in the multi-user environment without zero clients, you can try running the software in remote desktop sessions with PCs (run “mstsc”). 3D games are not well supported as desktop refreshment is just at 30 FPS. Graphic card sharing requires the host running a Windows 10 or Server 2016 system. Professional designers who require heavy rendering on an independent graphic card are not suggested to use this solution. If you need to use a specified industry software, please consult us before purchasing.
Trouble-shooting some applications that are supposed to be supported but still cannot be run with vCloudPoint zero clients:
1, The disk partition where the applications are installed must be set to be visible to terminal users. To configure visible disk partitions, open vMatrix Server Manager, click Configuration, and then Storage Visibility, tick the partition where your applications are installed.
2, Try disabling or enabling Windows UAC. Some software, especially security or administration software, may require administrator authority when Windows UAC is enabled. Therefore, when a non-administrator launch the software, it prompts the user to continue with administrator authority. In this case, you have to disable UAC for terminal users with ordinary user account level. While some software, especially the business software, like the famous Chinese software, Foxmail, and Fangyou, were designed without considering multi-user environment that all user data are stored in the same folder, which leads to interference among the users. For these software, you need to enable Windows UAC so that data of each user will be redirected to different folders. And you may also have to install the software in the folder of program files or program files (x86) under the system partition (C:\).
3, Change installation directory to non-user based. Default installation directory of some software like Kingsoft WPS is user based, like “C:\Users\Administrator”. When installing, you must change it to non-user based one, such as “C:\Program files\” otherwise other users are not able to run this software.
[/toggle] [toggle title=”11. Adding system created users to the vMatrix Server Remote Users group (Remote Desktop Users group)” state=”off” style=”simple” icon=”question-sign”](Last update: 28-Mar-2018)
By default, the Remote Desktop Users group is not populated. You must decide which users and groups should have permission to log on remotely, and then manually add them to the group. Particularly with vCloudPoint: Users created with vMatrix Server Manager are automatically added to the Remote Desktop Users group, but if the users are not created with vMatrix Server Manager, e.g., users created from system or domain, and they are non-administrators, then you have to manually added to the Remote Desktop users group.
- Open Computer Management. To open Computer Management, click Start, click Control Panel, double-click Administrative Tools, and then double-click Computer Management.
- In the console tree, click the Local Users and Groups node.
- In the details pane, double-click the Groups folder.
- Double-click Remote Desktop Users, and then click Add….
- On the Select Users dialog box, click Locations… to specify the search location
- Click Object Types… to specify the types of objects you want to search for.
- Click Check Names; When the name is located, click OK.
Important Note: To remotely log into the local system, the users must be in the Remote Desktop Users group, therefore, system created users or domain users must be manually added in the Remote Desktop Users group but NOT vMatrix Server Remote Users group.
[/toggle] [toggle title=”12. Configuring firewall and antivirus software for vCloudPoint products.” state=”off” style=”simple” icon=”question-sign”](Last update: 11-Mar-2016)
Configuring Firewall and Antivirus Software for vCloudPoint Products
Anti-virus, firewall, and other types of security software can sometimes interfere with the initial configuration or continued operation of vCloudPoint’s vMatrix software. This document gives basic information on applications, services, and network communication within vMatrix, which can be used to configure security software and help ensure compatibility and stable, continuous operation.
vMatrix Installation
Please make sure to DISABLE any Anti-Virus or Firewall software during the installation of our product. The software of this type has been tested and known to interfere with the installation of our product. After the installation has completed, you may re-enable Anti-Virus and Firewall software.
If system instability occurs after installing vMatrix, please try removing vMatrix and any anti-virus or security software present, and then re-installing vMatrix. If the system is stable in this configuration, re-install the anti-virus software. In some cases, this change in install order can improve the interaction between vMatrix and anti-virus software. If issues persist, please try configuring your security software to ignore/allow/trust the following ports and executables:
Exceptions
1. Port Exceptions
Remote Desktop Services: TCP 3389
vMatrix Network Services: TCP 13389-13342 plus 3 per user
UDP 13389
These ports are default settings on vMatrix’s installation but can be customized at vMatrix -> Configuration ->IP/TCP ports.
2. File Access Exceptions
On Firewall:
C:\Program Files\Cloudpoint\vMatrix\CpDaemon.exe
C:\Program Files\Cloudpoint\vMatrix\Driver\CpAccel.exe
On Anti-virus:
— By specific files:
—- For vMatrix functionality
C:\Program Files\Cloudpoint\vMatrix\CpDaemon.exe
C:\Program Files\Cloudpoint\vMatrix\Driver\CpAccel.exe
—- For vMatrix tray icon and User functionality
C:\Program Files\Cloudpoint\vMatrix\CpDeploy.exe
—- For vMatrix Admin manager
C:\Program Files\Cloudpoint\vMatrix\CpManager.exe
—- For vMatrix Diagnostic tools
C:\Program Files\Cloudpoint\vMatrix\DiagnosticTools.exe
—- For vMatrix Install and Update deploy tools
C:\Program Files\Cloudpoint\vMatrix\InstallDeployTools.exe
— By folder:
—- For all vMatrix functionality
C:\Program Files\Cloudpoint\vMatrix
(Last update: 25th-Mar-2020)
For remote connection with vCloudPoint zero clients over WAN, setting DMZ host is the easiest way but unsafe, therefore, you can add these ports in your router instead.
Enable the vCloudPoint zero clients to access a single host over WAN:
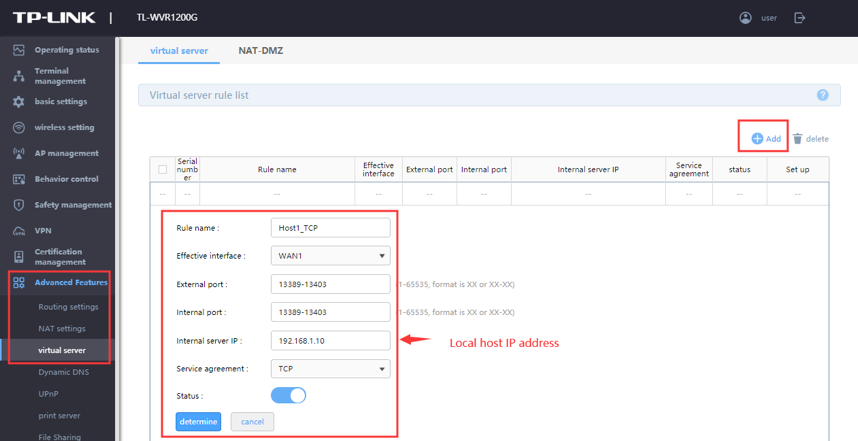
1. Set port forwarding rules on the router. By default, the listening port uses TCP13389-13393, and each end user uses one port, and the remote desktop service port is 3389.
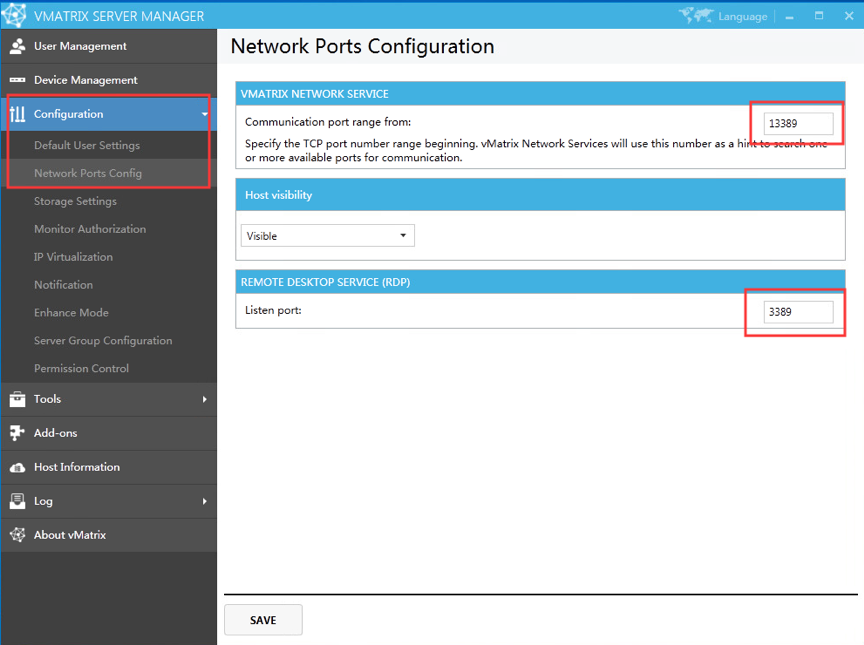
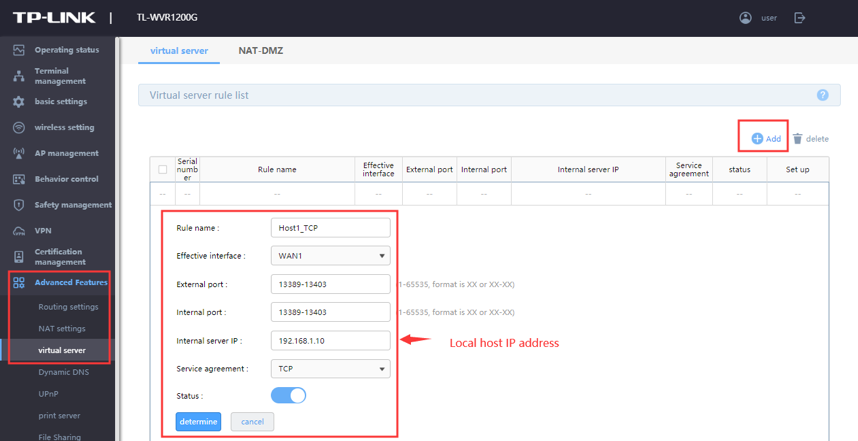
The following example is given on 10 users (always reserve more ports if possible). Settings may vary among routers. The following steps demonstrate the settings on a TP-WVR1200G router.

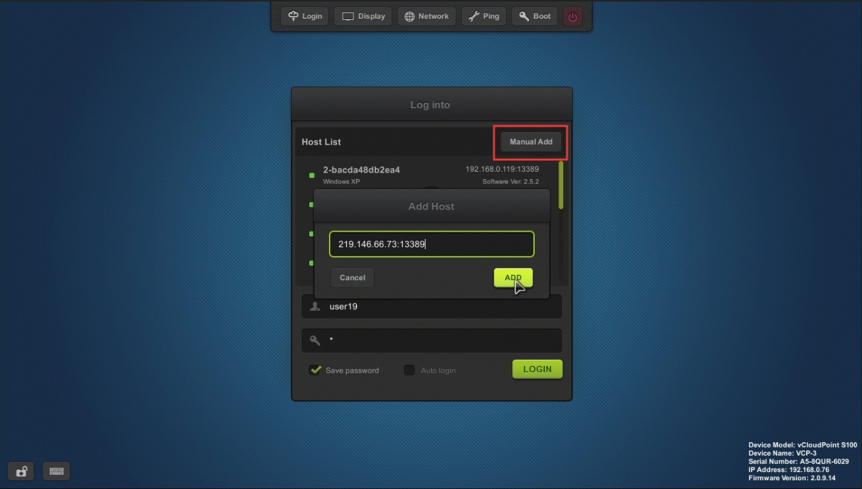
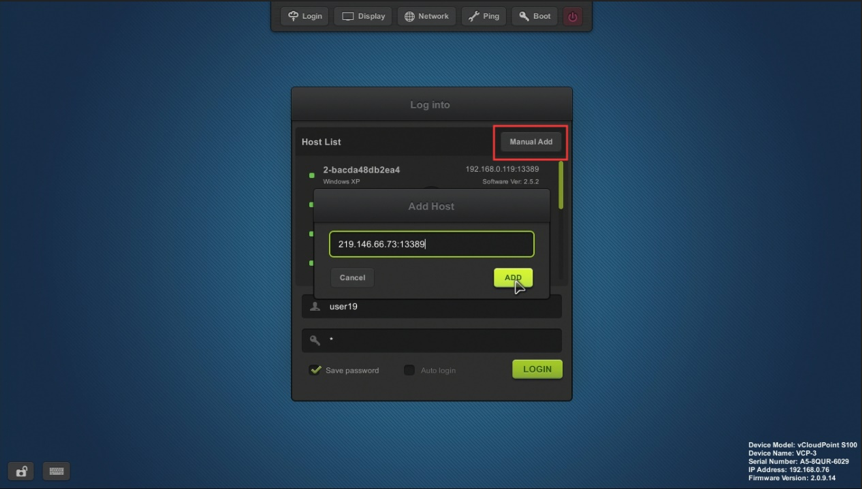
2. On the vCloudPoint zero clients login interface, manually add the public IP and corresponding port of the host to be logged in, for example, 219.146.73:13389.
Enable the vCloudPoint zero clients to access multiple hosts over WAN:
1. Open vMatrix → Configuration → Network Port Config, set the vMatrix Network Service ports, and the Remote Desktop Service ports of each host to be different and make sure that the ports are not occupied.
For example:
Host A, network port 13389, RDP port 3389, local IP: 192.168.1.10.
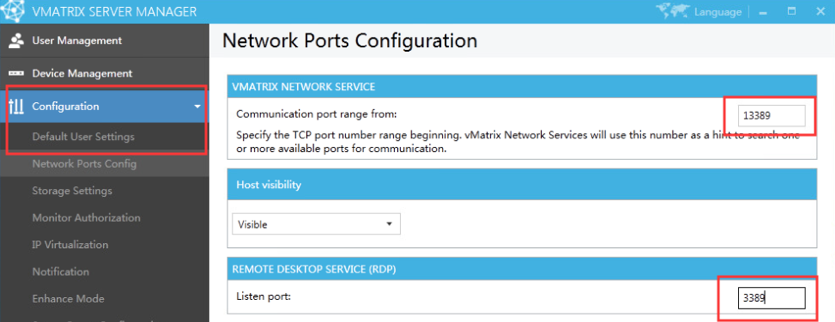
Host B, network port 23389, RDP port 3390, local IP: 192.168.1.20.
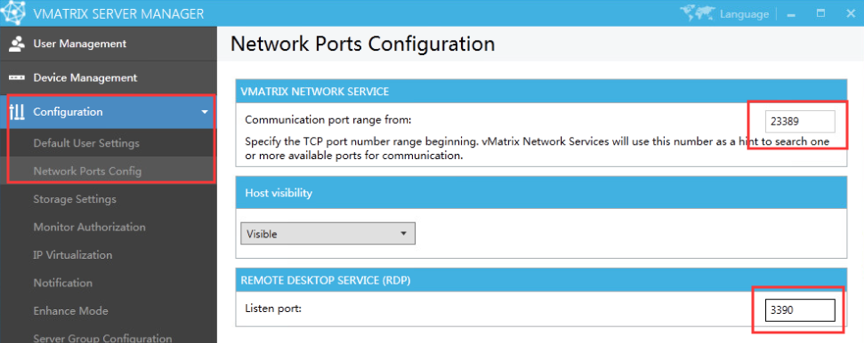
2. Set port forwarding rules on the router. By default, the listening port uses TCP13389-13393, and each end user uses one port. The following example is given on 10 users (always reserve more ports if possible). Settings may vary among routers. The following steps demonstrate the settings on a TP-WVR1200G router.
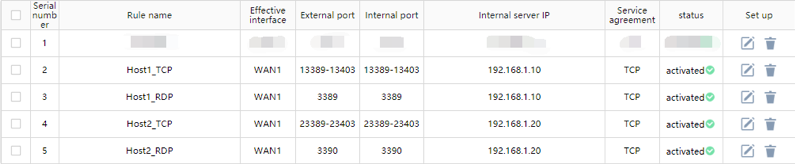
3. On the vCloudPoint zero clients login interface, manually add the public IP and corresponding port of the host to be logged in, for example, 219.146.73:13389 and 219.146.73:23389.
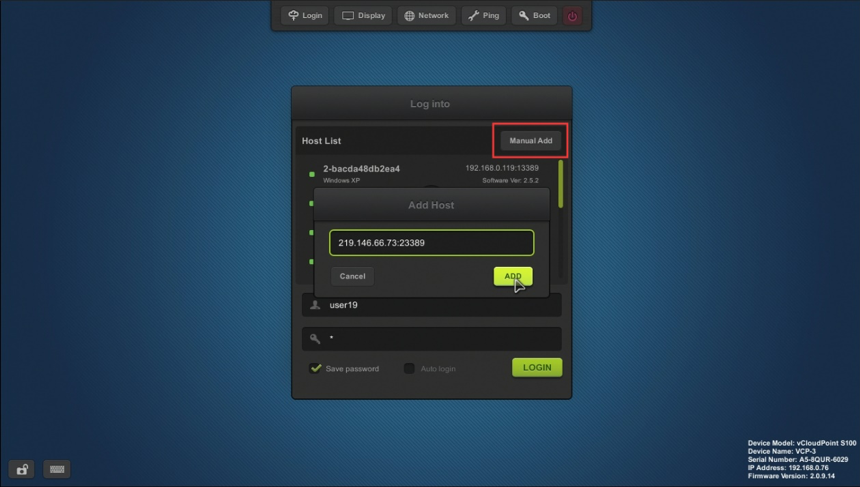
Note: Due to the limited bandwidth and high latency of WAN, the desktop performance may be significantly compromised. Please make sure the internet connection on both ends is well provisioned for delivering desirable desktop performance. It is recommended to provide a dedicated VPN network or configure a broadband network with an uplink speed of at least 10-20mpbs/user (depending on the user’s specific workload) for the host.
[/toggle] [toggle title=”14. Updating the zero client firmware.” state=”off” style=”simple” icon=”question-sign”](Last update: May-23-2016)
It is always recommended to use the latest available version of firmware on your vCloudPoint zero client. Each installation of vMatrix Server Manager includes the latest firmware, so no additional downloads are necessary to complete this process. When powered on, the zero client establishes a connection with vMatrix Server Manager and asks for an update if there is a new version available for update.
[/toggle] [toggle title=”15. Resetting the vCloudPoint zero clients.” state=”off” style=”simple” icon=”question-sign”](Last update: May-23-2016)
vCloudPoint zero clients like S100 provide two different methods to reset the device configurations:
1. Resetting custom configurations — press F2 on device boot.
This is to wipe out custom configurations such as saved username, password, resolution, background image and network, etc. This is often used for restoring desktop resolution which is out of range of the monitor to 1024×768.
2. Resetting firmware — long press the switch button until you see the resetting window.
This is to reset the device firmware to the factory installed one. All configurations will be recovered to the factory defaults. This is often used when device system turns faulty or is damaged by improper firmware upgrade.
[/toggle] [toggle title=”16. Connecting vCloudPoint zero clients to host through wireless network (WIFI).” state=”off” style=”simple” icon=”question-circle”](last update: Jul-26-2016)
Note: The wireless option of vCloudPoint S100 and V1 zero clients is designed for occasional use only. Due to the unreliable and high latency of most wireless network, user experience may significantly compromised (frequent laggings or unplanned disconnections). Customers are strongly recommended to use vCloudPoint zero clients with wired connection. For occasional cases or a few typical workplaces where a reliable cable connection is not provided, please test your wireless environement before actual deployment.
If you purchased a non-WIFI model of vCloudPoint zero clients, but later you want to work in the wireless environment, you can turn the zero client into a WIFi supported one by simply attaching a compatible external USB antenna to the vCloudPoint zero client. There are two ways for you to get the external USB antenna.
1, You can purchase the external USB antenna from your local vCloudPoint dealer.

2, Any antenna that is built with RTL8188EUS chip and connects with USB 2.0 standard is supported by vCloudPoint zero clients.
Given blow is the specification of the external USB antenna:
| Connection | USB2.0 |
| Chip | RTL8188EUS |
| Antenna | External 5dBi antenna |
| Antenna standard | IEEE 802.11g |
| IEEE 802.11b | |
| IEEE 802.11n | |
| Speed | 11b:1/2/5.5/11 Mbps |
| 11g:6/9/12/18/24/36/48/54 Mbps | |
| 11n: up to 150 Mbps | |
| Distance | up to 200 meters indoor |
| Frequency range | 2.4~2.4835GHZ |
| Working channel | 1~14 |
| Security features | WPA-PSK/WPA2-PSK |
| WPA/WPA2 | |
| 64/128/152bit WEP encryption | |
| Power | 2.5W |
Steps to configure external WIFI:
1, attach the USB antenna to the zero client;
2, reboot the zero client;
3, go to the “Network” page and you will see the WIFI option coming. See pictures below.
(the WIFI option will automatically display on Network page once the WIFI module is detected on device boot.)
(the first picture shows the “Network” page without WIFI option, and the second one shows that with WIFI option.)


(last update: Aug-09-2016)
By default, theme and wallpaper customization is disabled for terminal users through remote desktop connections. Administrators can enable this option for terminal users through a few simple steps. But enabling this option will increase large resources consumption on the host.
Here are steps to enable theme and wallpaper customization on Windows:
1) for hosts running Windows Client Systems like XP, 7, 8, 8.1, 10 (Desktop Experience features of client systems are pre-installed on system installation).
Open vMatrix Server Manager, on the initial User Management page, right click on the user module and then select “Property” to enter the user’s personal settings. (If you are configuring for all users at a time, go to “Configurations” -> “Default User Settings”.)

Click on “Advanced” tag and then select “optimum” to enable all desktop experience options including wallpapers, themes, menu animations, and window content on dragging. To only enable a single desktop experience option like wallpapers or themes, you can click on a “custom” button for further customization.

Scroll down to “Desktop Options”, select the options which you like to enable, and apply.

The change will take effect on the user’s next login.
2) for hosts running Windows Server Systems like Server 2008R2, 2012, 2012R2, 2016 and Multipoint Server 2011, 2012 (Desktop Experience features for server systems are not installed on system installation).
For server systems, you have to install the Desktop Experience features before configuring at vMatrix Server Manager.
Open Windows Server Manager;

Click “Add roles and features”;

Search for Features –> Desktop Experience;

Confirm to install Desktop Experience features;

When completed, restart the system and then open vMatrix Server Manager to enable the Desktop Experience options as the same to configure for Windows Client Systems mentioned above.
[/toggle] [toggle title=”18. Disable Pop-up Window Of Requesting Admin Permission (UAC whitelist)” state=”off” style=”simple” icon=”question-sign”](last update: Mar-29-2018)
Disable Pop-up Window of Requesting Admin Permission on Running Some Applications by adding The Applications to The UAC Whitelist
Description:
For security and management concern, you are recommended to have UAC (User Account Control) enabled. But with UAC enabled, zero client users may be asked by the UAC to enter admin credentials when they are running some applications that require admin permission. In this case, you may add these applications to the UAC whitelist without granting the zero client users with admin permission.
Notes:
1) UAC whitelist is used only when UAC is enabled. Refer to the document of User Account Control to enable UAC.
2) This feature requires the installation of ApplicationCompatibilityToolkitSetup.
Configuration Steps:
- Install exe. Simply click Next to finish installation.
- Open Compatibility Administrator(32-bit means adding a 32-bits application to the whitelist and 64-bit means adding a 64-bit application to the whitelist.
- Right click New Database, select Create New, select Application Fix…
- Enter the names of the application and the vendor to be fixed then click Browse.
- Find the installation path of the application, select the .exe launcher and click Open.
- Confirm and click Next.
- Check RunAsAdmin and RunAslnvoker, click Next.
- Click Next.
- Click finish.
- Click Save.
- Enter a DataBase name on the pop-up window, click OK.
- Enter a file name, then save.
- Click File then choose Install.
- The application now has been added to the UAC whitelist and zero client users can run the application without admin permission.
Issue:After installing the recent Windows system patch, shared hosts with RDP Wrapper does not support multiple user log-in. The system prompts a warning that the remote desktop user will log the previous user out. When running “RDPConf” file of RDP Wrapper, it shows “NOT SUPPORTED”.
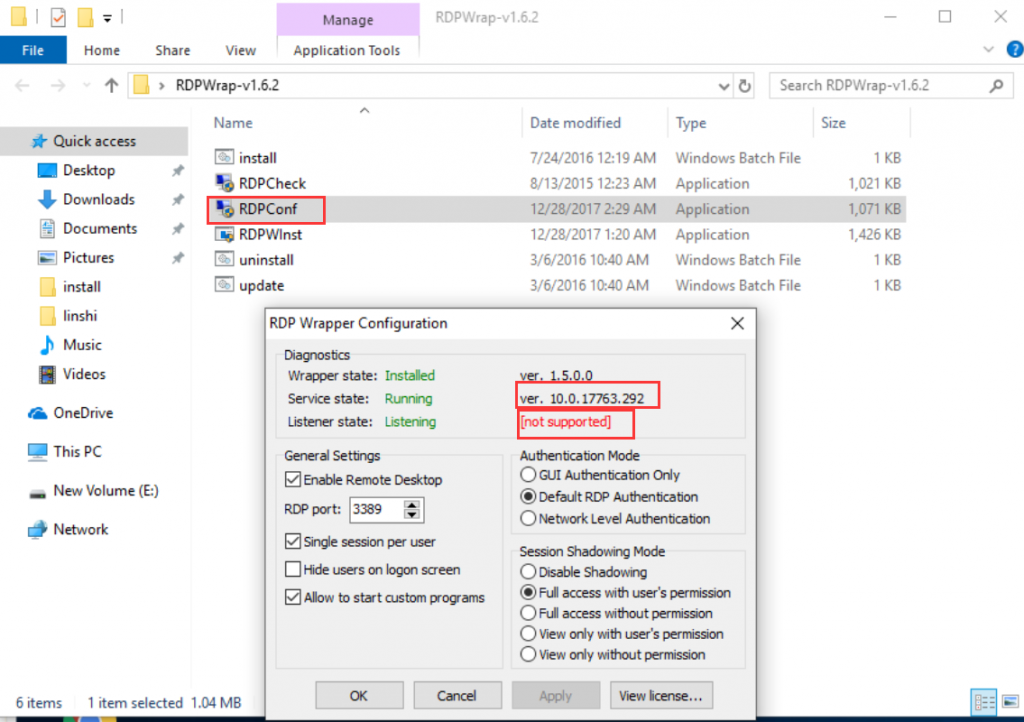
Cause:the system patch modified the terminal services (termsrv.dll) file, causing the RDP Wrapper failed.
Prior Solution: by updating RDP Wrapper
Run “update.bat” directly in the RDP Wrapper folder and wait for seconds for processing update; then run the “RDPConf.exe” file to check if it is supported after an update.
If the above update does not work, try the following solutions.
Recommended Solution 1 :by replacing the terminal services file (termsrv.dll) with an old version.
- Uninstall RDP wrapper: run the “uninstall.bat” file at the RDP Wrapper’s folder.
- Stop remote desktop services: open “services” panel, run “services.msc”, find “Remote Desktop Services” , double click to disable it.
- Replace the “termsrv.dll” file: click here to download and find the correct old version of “termsrv.dll” file according to your system.
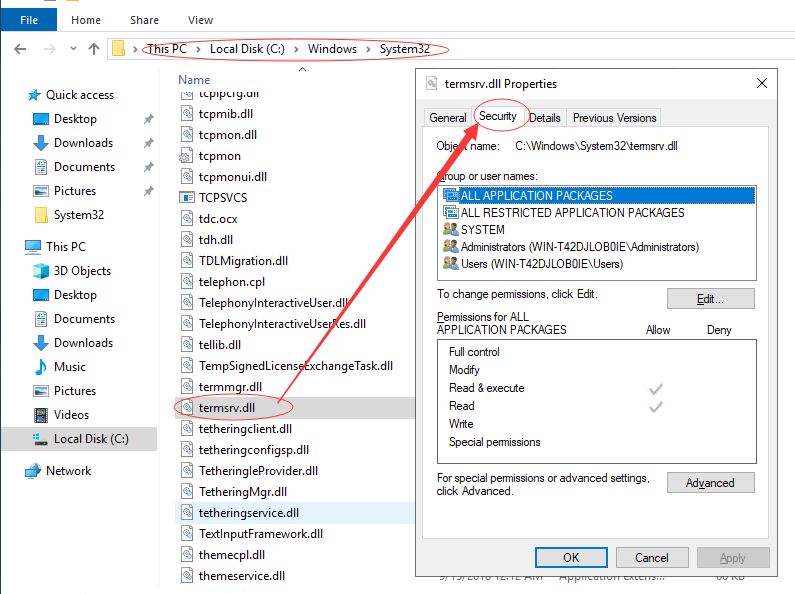
Go to C:\Windows\System32-> right-click to choose” Property”->Security
-> click “Advanced”
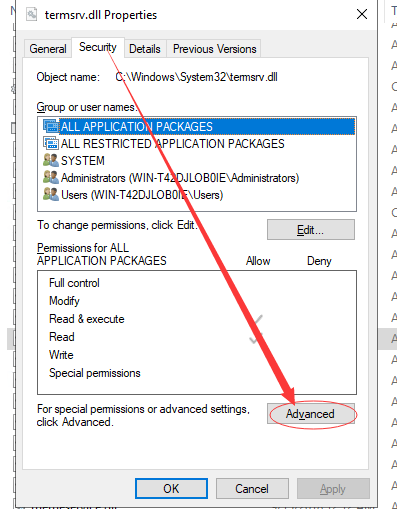
-> click “Change” to change the owner
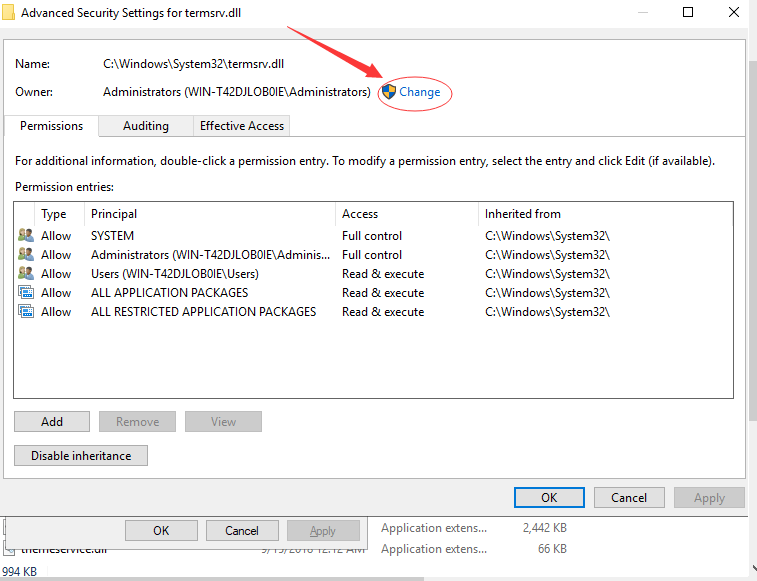
-> click “Advanced”
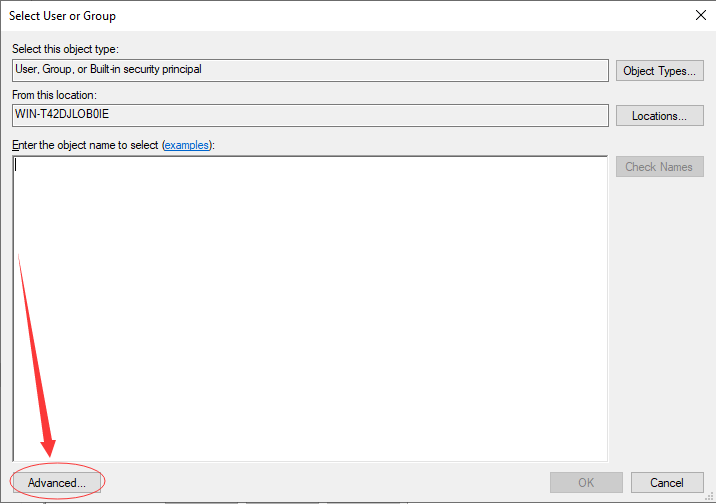
-> click “Find Now”
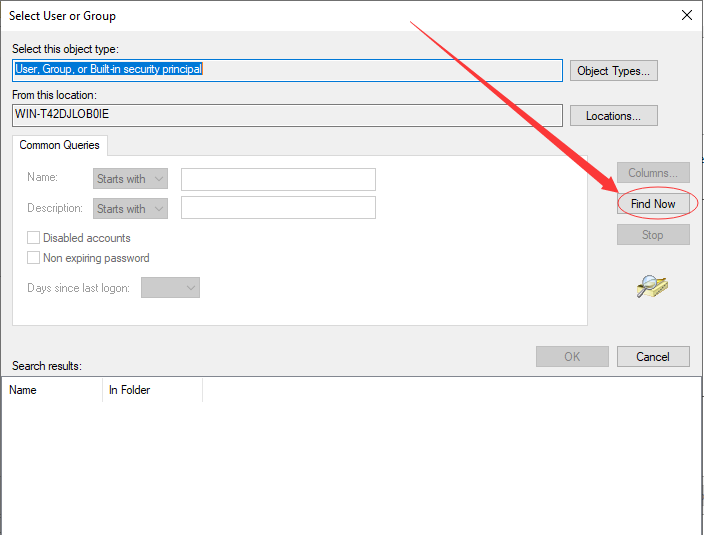
-> choose “Administrators” group
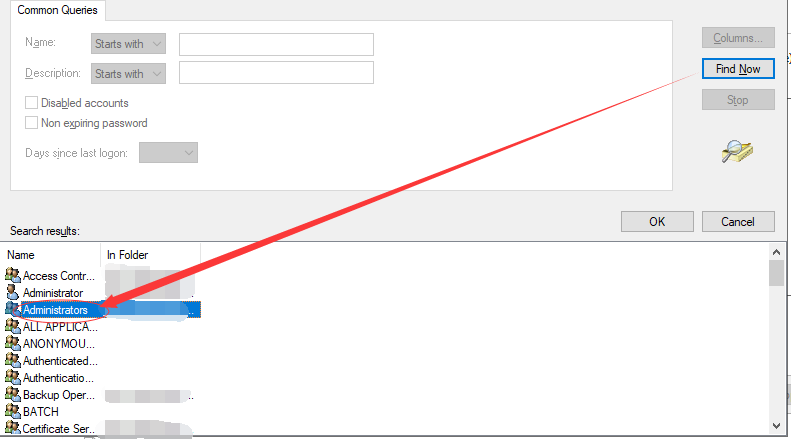
-> apply changes -> go back to the “Security” tab, click “Edit…”
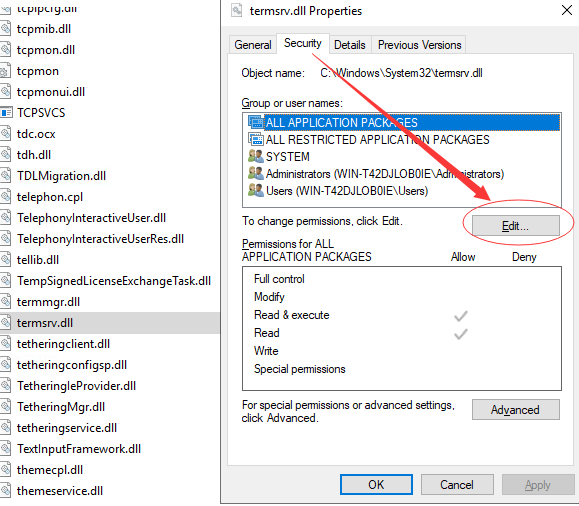
-> select to allow “modify”

-> apply changes -> right-click “termsrv.dll” file, and rename it,e.g.: “termsrv.dll.bak”
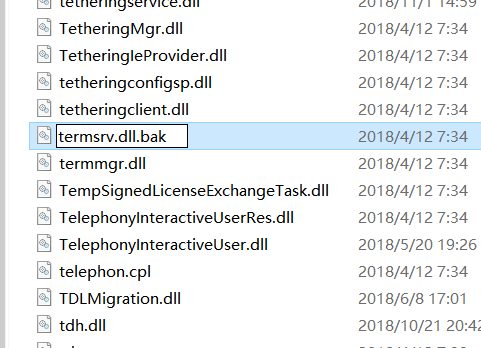
-> click “yes” in the pop-up window to confirm rename -> copy the downloaded old version of “termsrv.dll” into this folder to complete replacement.
- Enable remote desktop services.
- Re-install RDP Wrapper.
Solution 2:by uninstall the recent system patch.
Uninstall the patch through: start-> settings-> update & security-> view update history-> uninstall patches, click on the patch to uninstall; or run CMD command to uninstall: wusa /uninstall /kb:patch code/quiet .
Note: if you have deleted the patch backup in the system folder, you will find the uninstall option of this patch unavailable.
How to disable the automatic system update?
Download and install Windows Update blocker at https://www.sordum.org/.
Windows Update Blocker is developed by BlueLife and publish on sordum.org. Windows Update Blocker is a freeware that helps you to completely disable or enable Automatic Updates on your Windows system, with just a click of the button.
Windows Update blocker helps you automatically disable or enable the system services in association with Windows update, including Delivery Optimization Service(dosvc), Windows Update Medic Service(WaaSMedicSvc), Update Orchestrator Service(UsoSv), Background Intelligent Transfer Service(BITS). Or you can manually manage these services at the Services panel (run “services”).
Note: RDP Wrapper is developed by Stas‘M Corp and released on Github. Your use of RDP Wrapper is not legally licensed by Microsoft. We recommend you use RDP Wrapper for testing or trial purpose. For actual use of vCloudPoint products, you are always recommended to purchase and install Microsoft RDS-CALs which is compatible with any future Windows system updates.
[/toggle] [toggle title=”20. I installed the program on the host, why is there no icon displayed on the desktop of the end user?” state=”off” style=”simple” icon=”question-circle”]If the host can run the software and display its icon, but it not displayed on the end user’s desktop, please check as below:
1. check whether the software install in “C:\Program Files” or “C:\Program Files(x86)”. If the software is installed in the administrator’s own user path, end users will not be able to access the software because it doesn’t authorized user.
2. If the installation path is correct but the end user desktop does not display the icon, you need to manually send or copy the software shortcut to the public desktop (C:\Users\Public\Desktop).
Note: If the software itself does not support multi-user use, even if the end user desktop can display icons, it cannot be used normally.
(Last update: 03-Dec-2021)
vMatrix is not compatible with HVCI (Hypervisor-protected Code Integrity), enabling this function will cause terminal users unable to connect to CpAccel.
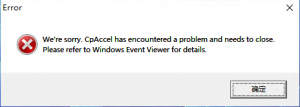
Please disable HVCI as followings: (there are 3 methods, you can choose one of them)
- Using Windows Security app
HVCI is labeled Memory integrity in the Windows Security app and it can be accessed via Settings > Update & Security > Windows Security > Device security > Core isolation details > Memory integrity. Disable it and restart the host as prompt.
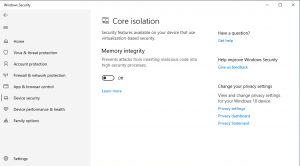
- Using Group Policy Editor
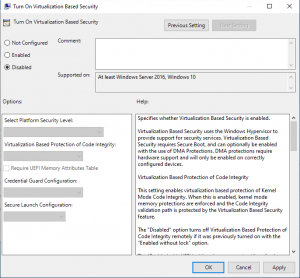
Press “Win“+”R” keys to run “gpedit.msc“. Navigate to Computer Configuration > Administrative Templates > System > Device Guard. Double-click Turn on Virtualization Based Security. Select “disable“, click “OK” and restart the host.
- Using Registry Editor
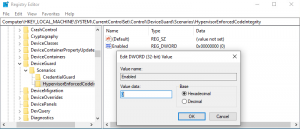
Press “Win“+”R” to run “regedit“. Navigate to this registry key, modify the value of Enabled to 0 and restart the host.
| Registry key | Value |
| HKLM\System\CurrentControlSet\Control\DeviceGuard\Scenarios\HypervisorEnforcedCodeIntegrity | Enabled=0 |
Notice: Current version of Windows 11 (21H2, OS build 22000.348) will enable HVCI by default when Hyper-v or virtual machine platform enabled. And HVCI cannot be disable by above 3 methods. So please do not enable Hyper-v or virtual machine platform.
Extensional Management Tips
[divider style=”simple”] [/divider] [toggle title=”Tip 01: Use VLC Player or K-lite codec pack to further reduce host CPU consumption on local video playback” state=”off” style=”simple” icon=”question-sign”](last update: Jan-09-2017)
When a single host computer is shared by multiple users running vCloudPoint zero clients, how to make the most use of the host resources and support more users is the administrator’s top concern. Which media player you choose and how you use it for playing local videos have a great impact on the CPU consumption of the host. GOM Player, KM Player, Potplayer, SMPlayer, and Media Player Classic are some of the popular media players that customers are most likely to use. These media player have the most codecs included for supporting a large number of media formats. However, as some of these media players do not support hardware acceleration, you may experience heavy CPU consumption when playing local videos with them.
Strongly Recommended:
VLC player supporting client-rendering with hardware acceleration
To help customers offload host-side CPU consumption on video playing and support more video users per host especially for cases where simutaneous video play is often required, beginning from vMatrix 2.0 version, we introduced a new feature of client-rendering support. This feature allows local videos played on the zero client with VLC player to be rendered locally by the client processor instead of the host cpu, therefore, host CPU consumption is only taken by the running the VLC player itself to as low as less than 1% of an i7 processor per video. This feature is supported by VLC player of 2.1.5 or newer versions and works automatically after the installation of vMatrix 2.x. You just make sure you are using the correct versions of vMatrix and VLC player and VLC player is selected to play the video, then you are ready to “save”.
Note: As the media content is not rendered at the host side, there is a drawback of using this feature: media content within the VLC player cannot be viewed by the administrator through monitoring at the host side.
Alternative:
Use K-lite codec pack with Media Player Classic supporting host-rendering with hardware acceleration
When using MPC (media player classic) for playing videos on the zero clients, although the rendering job still is done by the host CPU and the consumption is higher than using VLC player, as MPC supports hardware decoding, the host CPU consumption is greatly reduced, to as low as 1/2 of using other players without hardware acceleration.
Beblow is the download link and configuration steps:
1. download K-lite standard codec pack at http://www.codecguide.com. The Media Player Classic is bundled.
2. install the K-lite pack on the host. The Media Player Classic is integrated so you don’t have to install it separately.
3. Open “Codec Tweak Tool” at “Start” menu–>”K-Lite Codec Pack” or “Tools” at the installation file.
4. Click on “DirectShow (x86)” if you are Windows system is 32 bits, or “DirectShow (x64) if 64 bits.

5. On the next popup window, select “Video: LAV Video Decoder”, and apply.

After it is applied, “LAV Video Decoder” goes to “DISABLED FILTERS” as below:

6. Open the Media Player Classic, go to “View”-”Options”-”Playback”-”Output”, select the “DirectShow Video” option. And all configurations complete.

(last update: Mar-29-2018)
About NAS
NAS: Network-Attached Storage is a file-level computer data storage server connected to a computer Network providing data access to a heterogeneous group of client.
NAS(Network-Attached Storage) can be integrated into vCloudPoint’s shared computing solution to allocate private storage for each assigned zero client User.
Synology Network Storage Installation And User Instructions
Notes:
- This installation guide only applies to NAS model DS216j used as users’ private disk. Please choose the appropriate network storage plan according to your actual needs.
- Please use Gigabit or above LAN to ensure NAS Network bandwidth.
- Please use LAN with DHCP that can automatically assign IP.
- To use the other functions of Sysnology NAS, please refer to Synology’s official website :https://www.synology.com
Hardware Models:
NAS Server: Synology DiskStation DS216j
Hard Disk: Western Digital NAS Red Disk 4TB * 2
Hardware setup:
- Install the hard drive into the NAS, and secure it with screws.
- Connect the NAS to the switch using Ethernet cable.
- Connect the NAS to the power and finish the setup.
First Time Installation:
- Power the NAS device on, and wait for 1 to 2 minutes.
- Open the browser with any computer in the same LAN, view http://find.synology.com or the IP address of the NAS device to enter the Web Assistant page.
- After entering the Web Assistant page, click Install Now and confirm the hard disk mode (select the default system) to download the Synology DSM system from internet, follow the prompts to complete the installation.
- After installing the system, create the administrator account and customize DSM update and maintenance; leave QuickConnect settings as default.
- After initial installation is complete, enter the system;this storage solution is used only as a private disk for vCloudPoint users, other plug-ins is not required for installation.
NAS System Quick Setup:
- Open the control panel -> file sharing à shared folders and edit homes
- Select: (Hide this shared folder in “My Network Places”; Hide sub-folders and files from users without permission; Enable recycle bin) Cancel: (Restrict access to administrator only)
- Confirm the settings of the homes
- Apply the same steps to rest of the Shared Folders.
- Open Connectivity-> Network -> Network Interface, select LAN and Edit:
- IPv4 -> Usemanual configuration, set static IP address for the NAS device;
- IPv6 -> Select Off to turn off the IPv6, then confirm the
- Open Connectivity-> network -> traffic control, select the top right corner of the LAN -> Click Edit -> select All ports, Set the bandwidth settings. The default NAS LAN transmission bandwidth is 1 Gbps. But we recommend to set to 20000KB/s, the largest 40000KB/s. If bandwidth limitation is not set, users will use up all the bandwidth while transferring files.
- Open System-> theme style, set page landing page title and theme as needed.
- Open System-> Hardware & Power …you can customize Power Recovery, Beep Control, Fan Speed mode, Led Brightness Control.
- Open File sharing-> User -> Advanced : Password Settings-> apply password strength rule, scroll down to User home -> Enable User home services and Recycle bin.
- Open File Sharing -> User accounts, create users.
- Enter the user name and password (we recommend that NAS password should be different from vCloudPoint User password), Next step.
- System default group: leave as default, Next step.
- Assign shared folder permissions: leave as default, Next step.
- User quotas setting: set it according to the actual use of each user and can set to limit or unlimited, Next step.
- Assign application permission: leave as default, Next step.
- User speed limit: leave as default Next step.
- Check the new user settings, confirm then Apply.
- Select the user just created, select user -> Create-> Copy User, simply enter the user name and password, and copy all the user configuration.
- NAS installation completed.
Connect to the NAS device on a zero client:
- Open the File Explorer, enter the NAS device’s IP address : \\ xxx.xxx.xxx.xxx.
- Enter the assigned NAS user name and password, press OK.
- Right-click the home folder, select Map Network Drive, click Finish.
(last update: Mar-29-2018)
Software Restriction for Zero Client Users by Using AppLocker Group Policy
Description:
AppLocker Group Policy for Windows system Applications can be used for restricting User or User Groups from running and installing programs.
Typically, only administrators have permission to install programs. But green software and other software package do not necessarily need administrators’ permission to be installed. So using AppLocker Group policy can directly limit the User from accessing and installing all programs.
Tips:
- AppLocker Group Policy needs to be used in conjunction with User Account Control (UAC). Please refer to User Account Control Guide to turn on UAC.
- Before setting up AppLocker, please standardize the program installation path, be sure to install the required programs in C: \ Program Files or C: \ Program Files (x86) path. As Program Files folder is a kind of system file, which requires the administrator permission to make changes.
- Recommended operating systems: Windows 7 (Ultimate, Enterprise), Windows 8.1 Enterprise, Windows 10 (Professional, Enterprise), Server 2008R2 Standard, Datacenter, Server 2012R2 (Standard, Datacenter), Server 2016 (Standard, Datacenter).
Quick Configuration Steps:
- Enter Service, set the Application Identity startup type to automatic
- Enter the local Group Policy Editor àAppLocker
- Executable rulesà Windows installer rulesà and script specifications create default rules
- AppLocker open Configuration rules
- Restart the host, Then the AppLocker settings will take effect.
(last update: Mar-29-2018)
Restrict Zero Client Users To Modify System Files & Setting By Using User Account Control (UAC)
Description:
User Account Control (UAC) is a new set of infrastructure technologies in Windows Vista (and later Microsoft operating systems) that helps prevent malicious programs from damaging your system and helps organizations deploy easier-to-manage platforms.
With UAC, applications and tasks always run in the security context of a non- admin administrator account, except when an administrator specifically grants administrator-level access to the system. UAC will prevent the automatic installation of unauthorized applications to prevent inadvertent changes to the system settings can effectively limit the zero client user to modify the system.
Tips:
-
- Administrators must use a complex password.
- Do not add zero client users to the administrator group as UAC restrictions do not apply to administrators.
- After enabling UAC, when a nornal user attempts to open a folder that needs admin permission, he will be asked to enter the admin password. IT admins are suggested not to grant a normal user with admin-level access to temporarily access a restricted folder. Because once it is done, the normal user will have permanent access to this folder.
- UAC is recommened to be used with C Drive Access Restriction. For more detalis, please refer to the document of Restrict User Access To C Drive.
- Note: UAC is enabled by default in certain Windows Systems.
Enabling UAC:
- Open control panel, click User Account and Family Safety.
- Click User Account.
- Click Change User Account Control Settings.
- Adjust the level to the third level or the highest level and click OK.
- UAC settings are completed; restart the host.
(last update: Mar-29-2018)
Restrict Users Access To C Drive through Group Policy
Note:
- You can configure the Group Policy to prevent access to C drive through system File Manager, but you cannot restrict access through the third-party file manager, for example, decompression software.
- After you restrict access to C drive by Group Policy, all users, including the Admin account, cannot access C drive. Therefore, before you configure the Group Policy, you shall complete all installations and settings in C drive.
- Although the default desktop file path is in C drive. (C \ Users \username \ Desktop), after the restriction configuration, users can still create, download or drag files onto the desktop, but the “paste” function on the desktop is disabled. If you want to re-visit C drive, just modify the related Group Policy setting back to the default.
- When you configure C drive access restriction, you are suggested to have UAC enabled, otherwise, users are able to modify Group Policy to re-gain C drive access. For more details about UAC, refer to the “User Account Control” guide.
- Configuration Steps:
Log into the host with the Administrator account, run “gpedit.msc” to open the Group Policy Editor. - Computer Configuration>> User Configuration >>Administrative Template>>Windows Components>>Windows Explorer>> Prevent access to drives from My computer>> Edit policy setting.
- Enable this setting and select “Restrict C drive only” , click “OK“.
(last update: Mar-29-2018)
Limit User’s Disk Usage By Setting Disk Quotas
Description:
Disk quotas are applied to specific users and limit the amount of disk space that user can use on a particular volume.
Quick Configuration Steps:
1) Enter Local Group Policy Editor, enable disk quotas..
2) Set Quotas for users at the Properties of the disk partition.
3) Restart the host.
Detailed Configuration Steps:
1) Log in the host with an Admin account, run gpedit.msc to open Group Policy Editor.
2) Computer Configuration->Administrative Template->System->Disk Quotas-> double click Enable disk quotas to open Disk Quota settings.
3)Select the Enable option, click OK to save the setting.
4) Open My Computer, select the disk partition you want to limit usage. In this guide, we take Private Disk (E:) as an example. Right-click and select Properties.
5) Select the Quota option, tick “Enable quota management” and “Deny disk space user” to users exceeding quota limit, select and enter the same number for Limit the disk space and warning level.
Note: This operation only applies to the newly created user, you shall further do some configurations for the created users.
The option of Deny disk space to users exceeding quota limit shall be selected, otherwise, only a reminder will be shown but no restriction will be taken when a user exceeds the available space.
If you have not created users,you can skip the following steps. If you have created users, you shall still configure Quota Entries.
6) Click on the Quota Entries… option of the quota page of the previous step.
7) Select Quota in the task bar to create new quota entry. Click Advance.
8) Click Find Now, search for all the local users created, select and click OK to save.
9) Confirm the selected users and click OK.
10) Quota Entry windows will pop up. Enter the number for disk space and warming level, then click OK.
11) Log in with a created user, from the File Explorer, you will see the disk partition size is limited to the number you just set.
[button linking=”new_window” link=”https://www.vcloudpoint.com/wp-content/uploads/documentations/ENG/Limit_Disk_Usage_On_Users.pdf” align=”left” size=”small” type=”standard” style=”simple” icon=”download” title=”(last update: Mar-29-2018)”]Download This Guide[/button] [/toggle] [toggle title=”Tip 07: Prevent users from shutting down the host on Window 7 or XP” state=”off” style=”simple” icon=”question-sign”](last update: Mar-29-2016)
On Windows 8 or later systems, remote desktop users are not able to shut down the host. But for Windows 7 and earlier systems, the shutdown option is available to remote desktop users. Below is the guide to preventing zero clients users from shutting down the host.
1) on the host, open the security setting console through Control Panel –> Management Tools — >Local Security Settings –> Security Setting –> Local –> User’s right assignment –> Shutdown Operation system
2) delete users or groups that are not allow to shutdown host. 
(last update: Mar-29-2018)
Allow Zero Client Users To Shutdown The Shared Host Through Group Policy
Description:
By the default Windows Group Policy settings, zero client users can not restart/ shutdown the shared host. But in some cases, you may want to allow some zero client users to shut down the shared host when the IT admin is absent. In this case, you may configure the Goup Policy to allow some zero clients users to shut down the shared host.
Notes:
- IT admin shall remind zero client users to confirm if all other users on the same host are safely signed off before the shutdown/ restart operation. Zero client users can check out the connection status of all users on the host system at the User tab ofthe Task Manager (shortcut keys: Ctrl + Shift + Esc).
- To prevent from data loss or shutdown/ restart failure, zero client users shall save files, close applications and then sign off from the system before they power off the zero client device to end the work of the day.
Configuration Steps:
- Login to the system with an admin account,open the control panel.
- Open administrative Tools.
- Open Local Security Policy.
- Click Security Settings->Local Policy->User rights assignment, select shut down the system.
- Right-click System, set Properties, click Add Users or Group….
- Change the object type.
- Select Groups, confirm OK.Note: if you only want some specific users instead of all users to have the permission, you shall select the option of Users.
- Select Advance ….
- Click Find Now, select the group of vMatrixServerRemoteUsers, confirm OK.Note: if you only want some specific users instead of all users to have the permission and have selected the option of Users from the above step, you will be asked to select specific users here.
- Confirm the group or users are selected, click OK.
- Confirm that you have added the vMatrixServerRemoteUser group or users.
- All configurations are done.
(last update: May-3nd-2018)
Disable Password Complexity Requirement on Windows Server Systems through Group Policy
Description:
By default, Microsoft Windows Server System enforces users to use strong passwords for safety. But you can disable password complexity through group policy to avoid the trouble of using a complex password for zero client users.
Environment for this guide:
Windows Server 2012 R2
1, Click “Start” menu on the lower right corner of your desktop, and then go to “Run”, Input “secpol.msc” (without quotations). Then it appears the box of the Local Security Policy settings under the Group Policy.

2, Hit “Account Policy” on the right panel.

3, Hit “Password Policy”.

4, Find in the box “Password must meet complexity requirements”, and then double click it to change the setting.

5, In the pop-up window, select “Disable” and click “OK” to apply.

6, Now you can set new simple passwords. If needed, you can also disable password age, length and history in the same box.
[button linking=”new_window” link=”https://www.vcloudpoint.com/wp-content/uploads/documentations/ENG/Disable-Password-Complexity-Requirement-On-Windows-Server-Systems.pdf” align=”left” size=”small” type=”standard” style=”simple” icon=”download” title=”Disable Password Complexity Requirement On Windows Server Systems”]Download This Guide[/button] [/toggle] [toggle title=”Tip 10: Customize Public Desktop Icons” state=”off” style=”simple” icon=”question-circle”](last updated: Oct-28th-2019)
Some application software will not automatically create shortcut icons on the desktop of all end-users after installation. You can manage the shortcuts on the end user’s desktop centrally at the public desktop folder.
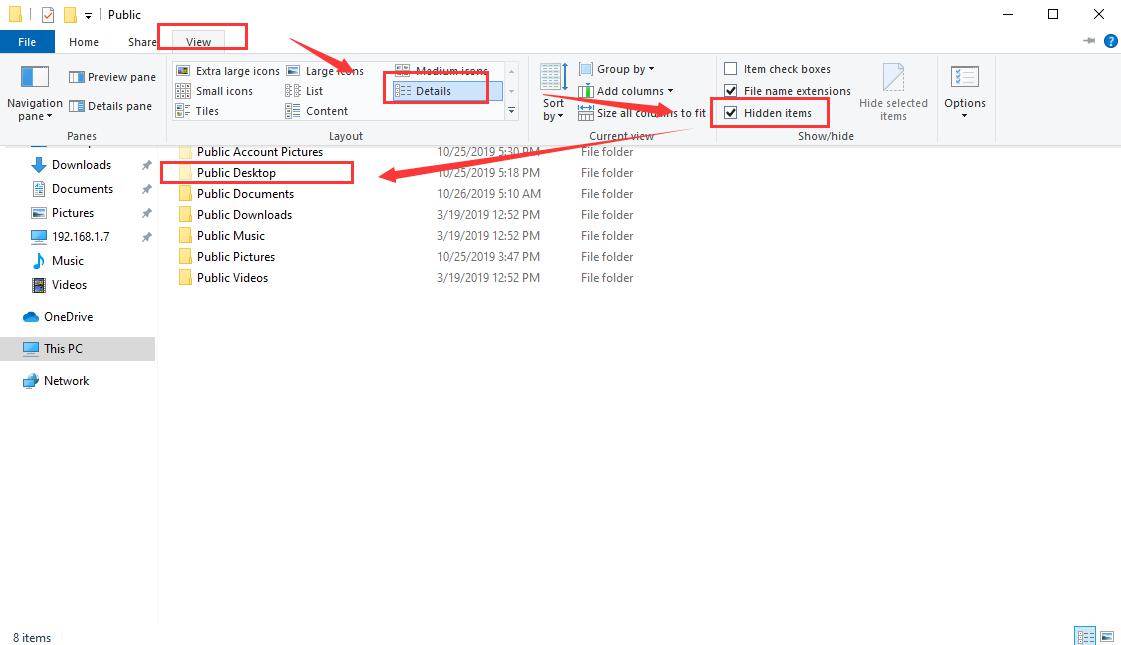
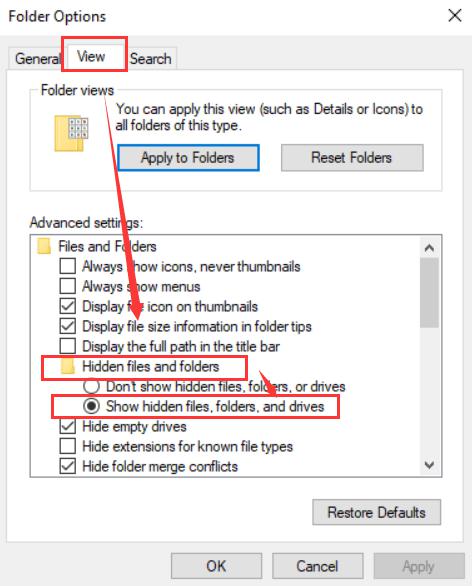
The default path of the public desktop folder is C:\Users\Public\Desktop, you can copy the path to the folder search bar and directly locate it, or open “This Computer” – “C Drive” – “User” – “Public”; public desktop folder is a hidden folder, you can show it by clicking on “View” – “Hidden Items” at the top menu (to show hidden folders in Windows 7/ 2008R2 or earlier systems, click “Folder options”- “View” – “Hidden files and folders” – “Show hidden files, folders, and drives”.
(last updated: Jun-17th-2020)
Description:
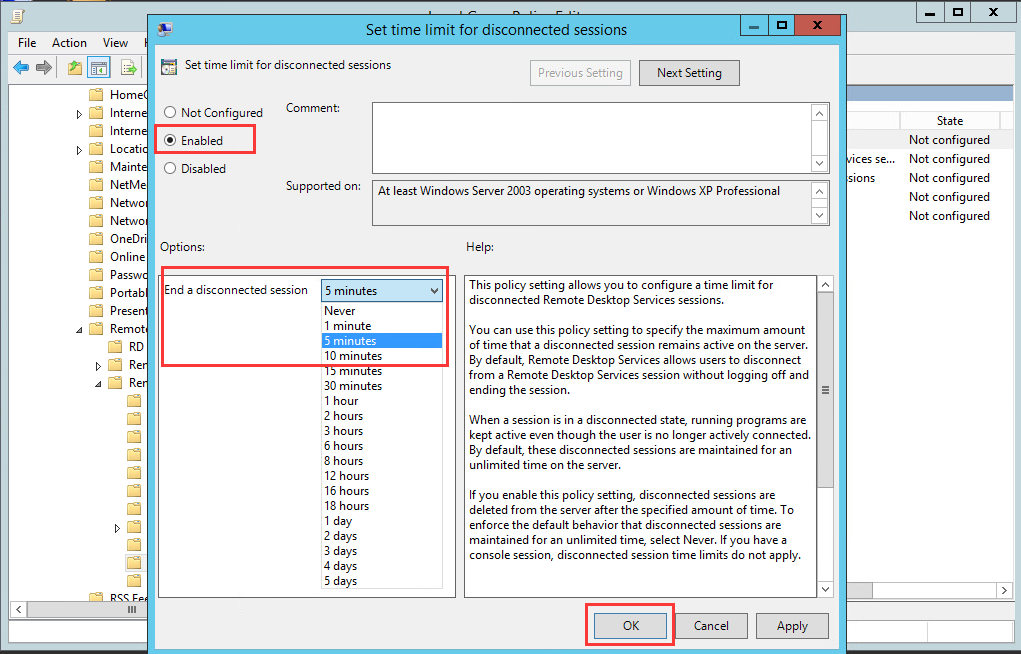
This policy setting allows you to configure a time limit for disconnected Remote Desktop Services sessions.
You can use this policy setting to specify the maximum amount of time that a disconnected session remains active on the server. By default, Remote Desktop Services allows users to disconnect from a Remote Desktop Services session without logging off and ending the session.
When a session is in a disconnected state, running programs are kept active even though the user is no longer actively connected. By default, these disconnected sessions are maintained for an unlimited time on the server.
If you enable this policy setting, disconnected sessions are deleted from the server after the specified amount of time. If you have a console session, disconnected session time limits do not apply.
Configuration Steps:
- Log in with an administrator account, press “Window”+ “R” to launch the“Run”
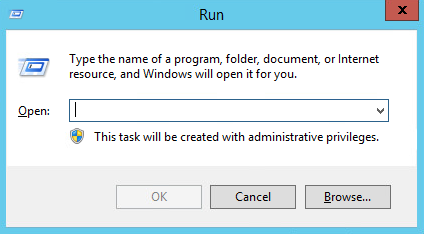
- Enter “gpedit.msc” and press “Enter” to enter the local group policy editor.
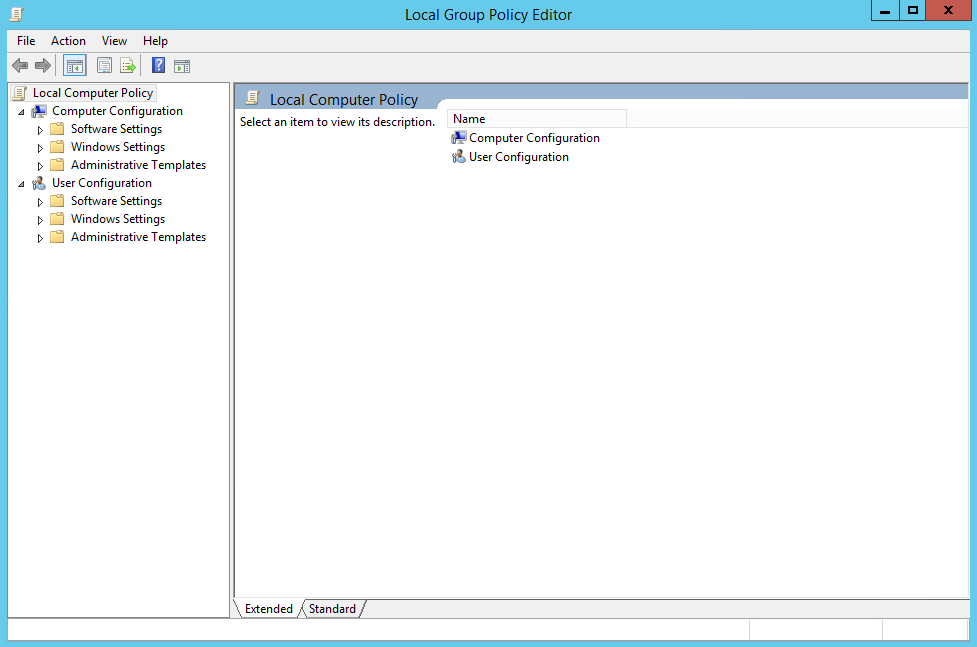
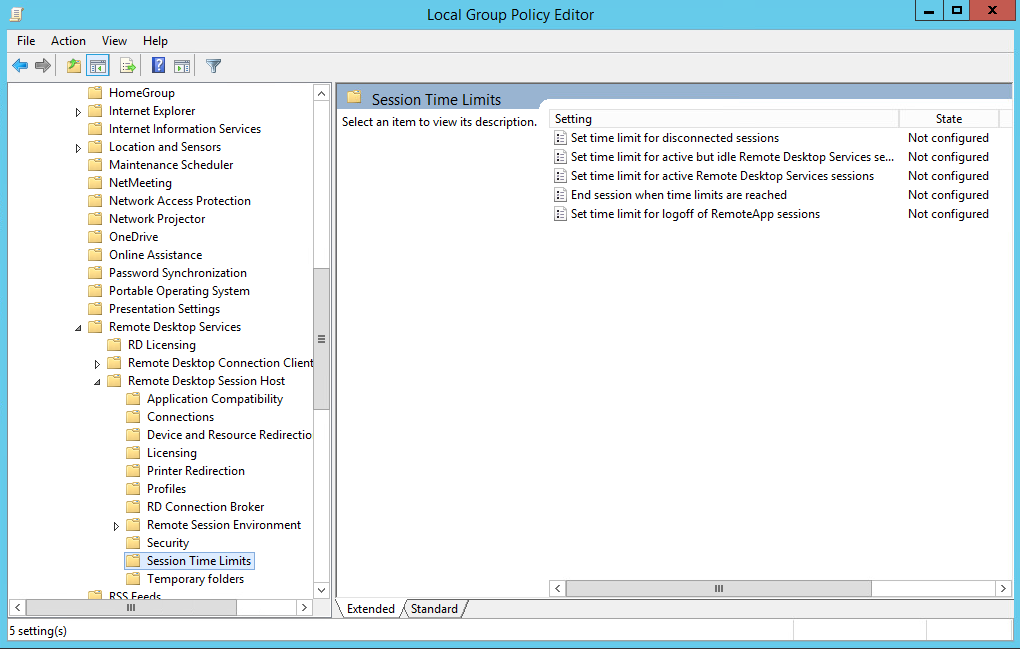
- Find:Computer Configurations->Administrative Templates-> Windows Components-> Remote Desktop Services-> Remote Desktop Connection Host-> Session Limits.
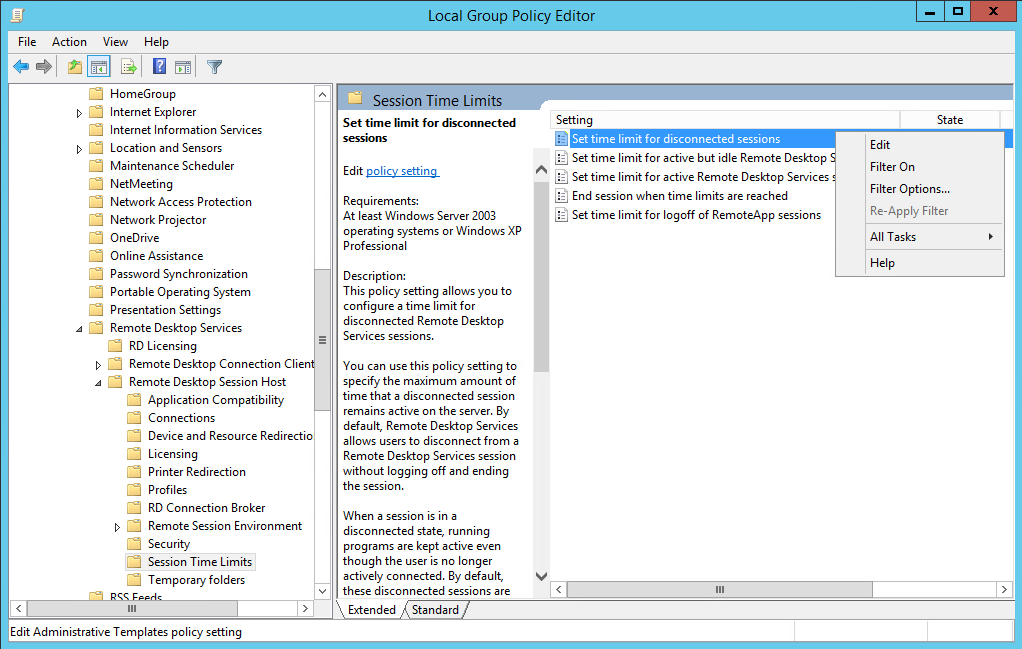
- Select “Set time limit for disconnected sessions”, right-click to select “Edit”.
- Select “Enabled”, and select a time at the options for“End a disconnected session”, and then click “OK” to apply the configurations.
(last updated: Jun-24th-2020)
Within a centralized computing solution, data is not stored on the user’s local devices but is stored centrally on the remote host or storage server, which facilitates the protection and control of information security, especially for organizations that are sensitive and demanding in data security. In addition to the execution of certain internet control policies to prevent date leak, organizations also need to limit write access to removable storage devices to prevent employees from copying confidential data to storage devices such as USB flash drives and portable hard drives.
Configuration Steps:
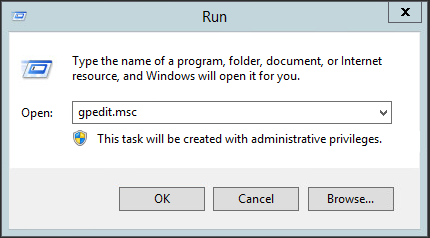
1) Log in with an administrator account, press “Window”+ “R” to launch the“Run” window and enter “gpedit.msc” to open the local group policy editor.
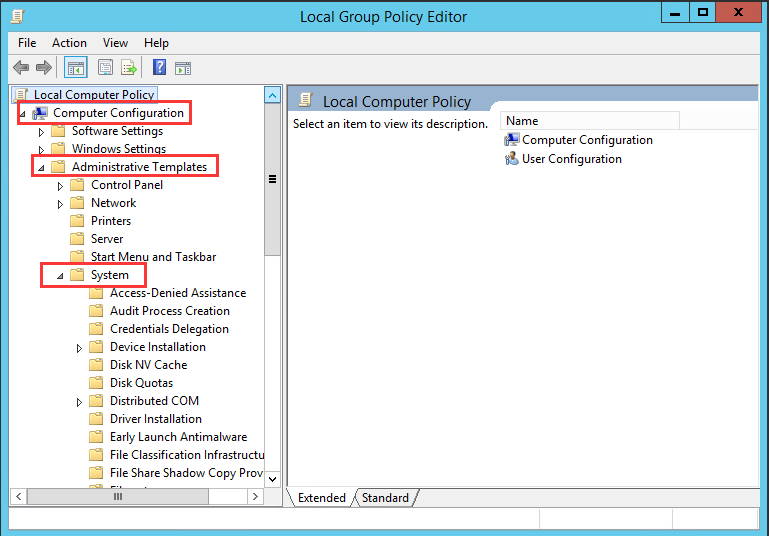
2) Find:Computer Configurations->Administrative Templates->System.
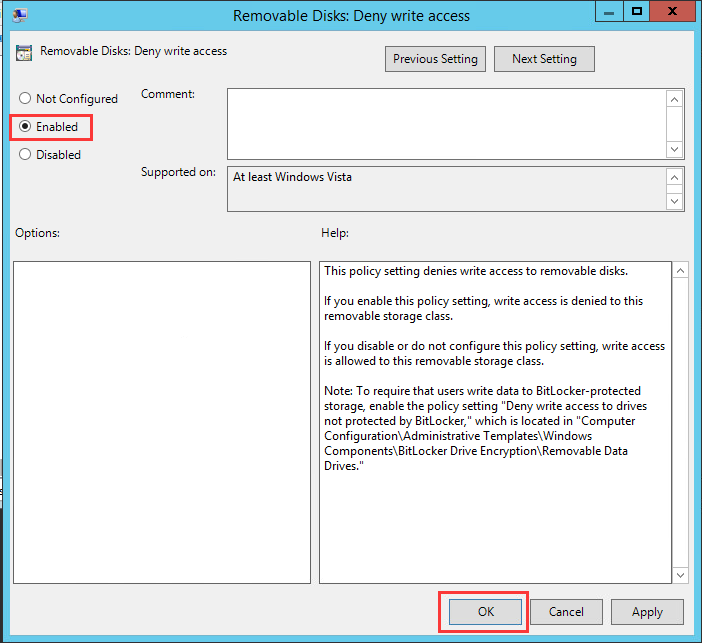
3) Click“Removable Storage Access”, and “Removable Disks: Deny write access” in the right panel.
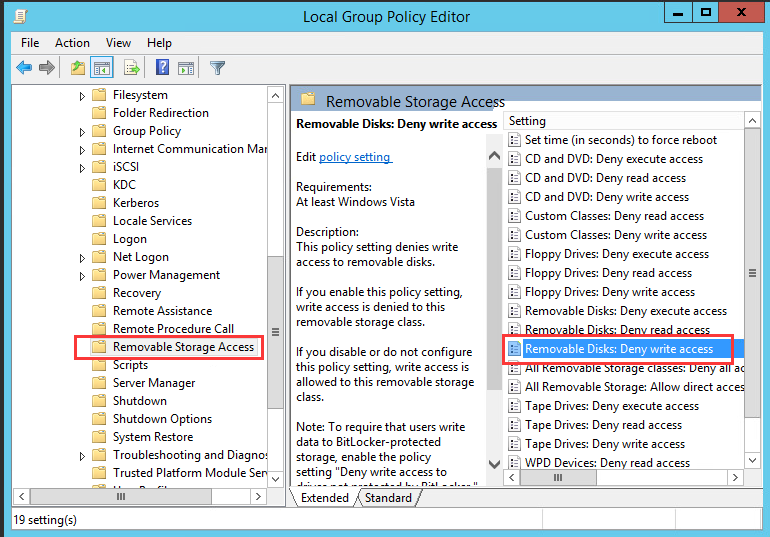
4) In the pop-up window, select “Enabled”, and then click “OK” to apply the setting.
5) After setting, users can read files in removable disks or copy to the host, but cannot write back to the removable disks.
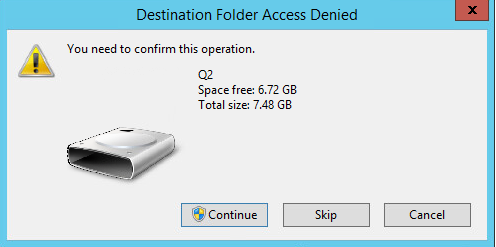
Note: This policy is also applicable to administrators. After setting, administrators will also be restricted from writing to removable disks.
[/toggle] [/section]